Wednesday, January 12, 2011

Documentum Foundation Classes 6

DFC (Documentum Foundation Classes 6.0)
DFC is a key part of the Documentum software platform. While the main user of DFC is other Documentum software, you can use DFC in any of the following ways:

• Access Documentum functionality from within one of your company’s enterprise applications.
For example, your corporate purchasing application can retrieve a contract from your Documentum system.
• Customize or extend products such as Webtop.
For example, you can modify Webtop functionality to implement one of your company’s business rules.
• Write a method or procedure for Content Server to execute as part of a workflow or document
lifecycle.
For example, the procedure that runs when you promote an XML document might apply a transformation to it and start a workflow to subject the transformed document to a predefined business process.

You can view Documentum functionality as having the following elements:
Repositories One or more places where you keep the content and associated metadata of your organization’s information. The metadata resides in a relational database, and the content resides in various storage elements.

Content Server
Software that manages, protects, and imposes an object oriented structure on the information in repositories. It provides tools for managing the lifecycles of that information and automating processes for manipulating it.

Client programs
Software that provides interfaces between Content Server and end users. The most common clients run on application servers (for example, Webtop).

End Users People who control, contribute, or use your organization’s information. They use a browser to access client programs running on application servers.

Documentum Foundation Classes (DFC) lies between Content Server and clients. Documentum Foundation Services are the primary client interface to the Documentum platform. Documentum Foundation Classes are used for serverside business logic and customization.

DFC is Java based. As a result, client programs that are Java based can interface directly with DFC.When application developers use DFC, it is usually within the customization model of a Documentum client, though you can also use DFC to develop the methods associated with Content Server functionality, such as document lifecycles.

In the Java application server environment, Documentum client software rests on the foundation provided by the Web Development Kit (WDK). This client has a customization model that allows you to modify the user interface and also implement some business logic. However, the principal tool for
adding custom business logic to a Documentum system is to use the Business Object Framework (BOF).

BOF enables you to implement business rules and patterns as reusable elements, called modules. The most important modules for application developers are type based objects (TBOs), service based
objects (SBOs), and Aspects. Aspect modules are similar to TBOs, but enable you to attach properties and behaviour on an instancebyinstance basis, independent of the target object’s type.
BOF makes it possible to extend some of DFC’s implementation classes. As a result, you can introduce new functionality in such a way that existing programs begin immediately to reflect changes you make to the underlying business logic.

The Documentum Content Server Fundamentals manual provides a conceptual explanation of the capabilities of Content Server. DFC provides a framework for accessing those capabilities. Using DFC and BOF makes your code much more likely to survive future architectural changes to theDocumentum system.

Where Is DFC?
DFC runs on a Java virtual machine (JVM), which can be on:
• The machine that runs Content Server.
For example, to be called from a method as part of a workflow or document lifecycle.
• A middletier system.
For example, on an application server to support WDK or to execute server methods.

For client machines, Documentum 6 now provides Documentum Foundation Services (DFS) as the primary support for applications communicating with the Documentum platform.

Acronyms
DFC      Documentum Foundation Classes
TBO     Type based object
SBO     Service based object
WDK     Web development toolkit
BOF     Business object framework


Sunday, December 19, 2010

Microsoft Dynamic Langugage Runtime (DLR)

The Dynamic Language Runtime (DLR) is a set of libraries built on the CLR to support dynamic language implementations on .NET. A key value proposition of the .NET CLR is supporting multiple languages and allowing them to inter operate with each other. Dynamic languages have become very popular in the last several years. Customers want to use their favorite dynamic language and have great .NET interoperability for building applications and providing scripting for applications. The DLR makes it very easy to develop dynamic languages on .NET.
The DLR provides three key components:
  1.  language implementation services with language interoperability model
  2.  dynamic language runtime services with fast dynamic dispatch and library support
  3.  common hosting APIs across languages
The key goals of the DLR are making it easy to
  1.  port dynamic languages to .NET
  2.  add dynamic features to your existing language
  3.  author libraries whose objects support dynamic operations
  4.  employ dynamic languages in your applications and frameworks.
DLR hosting APIs
The DLR Hosting API is a programming interface that allows one language’s code to execute in another
language. It helps in using a Dynamic Language’s Code in a Static Language.

Dynamic Languages - Outside .net family of languages. For example: Ruby or Python
Static Languages - .NET languages like VB.net, C#.net etc.
For more information please visit http://dlr.codeplex.com/

Monday, November 08, 2010

K2 BlackPoint

K2 BlackPoint is used to create new workflow using Microsoft Sharepoint and Microsoft Infopath.

It has two designers a). K2 Studio and b). K2 Web Designer

Benefits:
a). Visual tools to create worflow.
b). No coding required.
c). Tools that can be used by non developer.

For more information visit http://www.k2.com/en/blackpoint.aspx

Wednesday, October 13, 2010

Generate barcodes using barcode4j

Barcode4J is a barcodes generator written in Java. It's free, available under the Apache License, version 2.0.It supports generating 1D and 2D barcodes of various types.

a) Implementations

* 1D barcode implementations
          o Interleaved 2 of 5
          o Code 39
          o Code 128
          o Codabar
          o POSTNET
& more
 * 2D barcode implementations :
          o PDF 417 (ISO/IEC 15438:2001(E))
          o DataMatrix (ISO/IEC 16022:2000(E))

b) Support for multiple formats:
It supports various file formats viz. SVG, EPS (Encapsulated PostScript), Bitmap images (such as PNG or JPEG),  Java2D (AWT), Text (for testing and debugging only).
http://barcode4j.sourceforge.net/2.0/output-formats.html


c)Barcode Servlet with support for SVG, EPS and bitmap output

d) Command-line interface
barcode4j has command line support so you can generate barcode by executing a command on command line.

e) Plug-ins/extensions for third-party products:
          o Apache Xalan: SVG-generating XSLT extension
          o SAXON XSLT Processor : SVG-generating XSLT extension
          o Apache FOP: support as fo:instream-foreign-object

For more information go to http://barcode4j.sourceforge.net/

Wednesday, October 06, 2010

IBM Classification Module and Content Extractor

IBM® Classification Module
IBM® Classification Module helps organize unstructured content by analyzing the full text of documents and e-mails and applying rules that automate classification decisions.
IBM Classification Module reduces the burden of manual decision making that is done by employees by accurately and automatically organizing information.
It is embedded with natural language processing and semantic analysis capabilities,
CLASSIFICATION WORKBENCH
An application that is used to create and analyze knowledge bases and decision plans. With Classification Workbench, you can also evaluate system performance by importing analysis data and viewing reports and graphical diagnostics.
KNOWLEDGE BASE
A single file encapsulating data that is required by the Classification Module for accurate content-based classification
DECISION PLAN
A collection of rules built in Classification Workbench that determine how the Classification Module classifies content items such as documents or e-mails. Each rule consists of one trigger and one or more actions.
CLASSIFICATION CENTER
A Web application provided with the IBM FileNet P8 integration that is used to manage the classification processes. You can use the Classification Center to determine the content to be classified, specify classification options (such as the decision plan to use and various runtime preferences), monitor classification activity, and view the classification results
 
Content Extractor
A command-line tool provided with the IBM FileNet P8 integration that is used to extract the content from an IBM FileNet P8 object store. You can import the extracted content into Classification Workbench and use it to train a knowledge base or provide test data for a decision plan.

It uses a properties file where option for what to be extracted is specified and extracts the document in XML format.

IBM WebSphere Transformation Extender (WTX)


Its a dedicated data transformation engine for app integration. It’s being used in organizations around the world. A transformation engine accepts FILE docs or electronic messages as inputs, parsed them using data dictionary like definitions & transforms them into one or more o/p messages.

It can convert all most any formatted content and does this without any coding/scripting by developer. WTX is a family of products and has editions tailored to ESB, BPM and B2B products.

How does it connect to existing applications?
WTX has local file system support by default. This helps for testing transformations thoroughly before moving to the connectivity phase.

How does WTX aid application reuse?
For example Industry Standards, they get updated usually one/twice a year. As organizations are required to follow the standards so the rules are coded in to the apps. You can end up in spending so much time and money on maintenance and not on new projects. WTX protects apps from change and allow them to participate in new projects.

Thursday, September 30, 2010

Making CXF Web service accept SOAP 1.2 request


By default CXF Web Service provides SOAP 1.1 end point. In order for your web service to expose SOAP 1.2 endpoint and accept SOAP 1.2 request configure the following settings in server side CXF config file of the Web Service:

Creating SOAP 1.2 end point

<jaxws:endpoint id="auth" implementor="#AuthService" address="/cxfSearch12">
<jaxws:binding>
         <soap:soapBinding version="1.2" mtomEnabled="true"/>jaxws:binding>
<jaxws:features>
        <bean class="org.apache.cxf.feature.LoggingFeature"/>
      jaxws:features>
      <jaxws:inInterceptors>
               <bean class="org.apache.cxf.binding.soap.saaj.SAAJInInterceptor"/>  <ref bean="wss4jInConfiguration"/>
      jaxws:inInterceptors>
 jaxws:endpoint>

Calling SSL enabled CXF Web Service From Java Client

Calling a SSL enabled service which also expects UserToken to be passed can be very frustrating. It has been really painful for me to consume SSL enabled CXF service and I spent nearly 1 week to get it working.


Environment
Apache Tomcat 6.0.28
JDK 1.6
CXF 2.2.3
IBM Rational Developer 7.5.2
Spring Web 2.5.6


We deployed the CXF Web Service with SSL and installed the security certificate (self signed) on the client machine.

I was able to view the WSDL coming in the browser but the problem started when I tried to call Web Service from Java Client. I was getting “Message could not sent”. I set the proxy in RAD and imported the client certificate in the JVM. Configured following JVM arguments:

-Djavax.net.ssl.trustStore="C:\Program Files\IBM\SDP\jdk\bin\mykeystore"
-Djavax.net.ssl.trustStorePassword="password"

But this configuration did not change the error message.

My next attempt was to configure proxy arguments in addition to the above JVM arguments for my program

-Djavax.net.ssl.trustStore="C:\Program Files\IBM\SDP\jdk\bin\mykeystore"
-Djavax.net.ssl.trustStorePassword="password"
-Dhttp.proxyHost=yourproxy
-Dhttp.proxyPort=8080
-Dhttps.proxyHost=yourproxy
-Dhttps.proxyPort=8080

Now I started getting ‘SSLHandshakeException’, ‘javax.net.ssl.SSLHandshakeException: Couldn't find trusted certificate’ . It confirmed that the client was trying to use the certificate to reach Web Service but due to self signed certificate it was getting invalidated.

Then I found a link on internet which covered my problem scenario and suggested to accept whatever certificate your application is trying to use instead of JVM trying to validate it. I used following code to accept the certificate with out checking its validity and I was able to reach Web Service successfully.


import javax.net.ssl.TrustManager;
import javax.net.ssl.X509TrustManager;
import org.apache.cxf.configuration.jsse.TLSClientParameters;
import org.apache.cxf.endpoint.Client;
import org.apache.cxf.frontend.ClientProxy;
import org.apache.cxf.frontend.ClientProxyFactoryBean;
import org.apache.cxf.transport.http.HTTPConduit;
import org.springframework.context.ApplicationContext;
import org.springframework.context.support.ClassPathXmlApplicationContext;

public static void main(String[] args)
  {
ApplicationContext context = new ClassPathXmlApplicationContext("appcontext.xml");

InfoService client = (InfoService) context.getBean("client");
ClientProxyFactoryBean factory = new ClientProxyFactoryBean();
Client proxy = ClientProxy.getClient( client );
HTTPConduit conduit = (HTTPConduit) proxy.getConduit();
TLSClientParameters tcp = new TLSClientParameters();

//Creating Trust Manager
TrustManager[] trustAllCerts = new TrustManager[] {
      new X509TrustManager()
         {
          public java.security.cert.X509Certificate[] getAcceptedIssuers()
           {
              return null;
           }
          public void checkClientTrusted(
                                                      java.security.cert.X509Certificate[] certs, String authType)  {      }
             
          public void checkServerTrusted(
                                                       java.security.cert.X509Certificate[] certs, String authType)
{
     System.out.println("authType is " + authType);
     System.out.println("cert issuers");
     for (int i = 0; i < certs.length; i++) {
     System.out.println("\t" + certs[i].getIssuerX500Principal().getName());
     System.out.println("\t" + certs[i].getIssuerDN().getName());
                }
           }
    }
};
                           
                        
tcp.setTrustManagers(trustAllCerts);
conduit.setTlsClientParameters( tcp );

client.callWebServiceMethod();
  }
}

Resources used:


Read Posting from Daniel


Monday, August 02, 2010

What is JaWin and how to use it?

JaWin
The Java/Win32 integration project (Jawin) is a free, open source architecture for interoperation between Java and components exposed through Microsoft's Component Object Model (COM) or through Win32 Dynamic Link Libraries (DLLs).
For more information visit http://jawinproject.sourceforge.net/

How to use Jawin - A practical example
================================

a). If you have .tlb (COM Type Library) file available for the COM object you want to use then skip Step1 and proceed to Step3.
b). If you already have .Net component ready which you want to use from Java code then proceed to Step2:
c). If you want to develop a .NET component to be used via JAWIN then proceed to Step1:


Step1: Developing a .Net component (class library)

(a). Create an interface and before its declaration put .net attribute as given below
      [Guid("3823a63d-5891-3b4f-A460-DB0FB847075A")]
  See the code snippet below for mor einformation:

using System;
using System.Collections.Generic;
using System.Text;
using System.Runtime.InteropServices;

namespace Org.Jawin.ManageWinProcess
{
       [Guid("3823a63d-5891-3b4f-A460-DB0FB847075A")]
       public interface IWinProcessOperations
       {
       Boolean IsProcessActive(String sProcessName);
       Boolean KillRunningProcess(String sProcessName);
}

b) Now Implement the interface created above and in the implementation class before the name of class declaration, type the following attributes
[Guid("25c2f5a2-1afe-36ce-BE27-84E040F5E19A")]
[ProgId("Jawin.WinProcessOps")] // You would be using this prog id while creating an instance of this class in JAVA.


See the code snippet below for more information:


using System;
using System.Collections.Generic;
using System.Text;
using System.ServiceProcess;
using System.Text.RegularExpressions;
using System.Runtime.InteropServices;
namespace Org.Jawin.ManageWinProcess
{

         [Guid("25c2f5a2-1afe-36ce-BE27-84E040F5E19A")]
         [ProgId("Jawin.WinProcessOps")]
         public class Operations:IWinProcessOperations
         {
             public Operations(){ }
             public Boolean isProcessActive(String ProcessName)
             {
                  String machine = ".";
                  Boolean processRunning = false;
                  // Get the current processes
                   System.Diagnostics.Process[] runningProcesses = System.Diagnostics.Process.GetProcesses(machine);
                 // Find those that match the specified regular expression
                  Regex processFilter = new Regex(ProcessName, RegexOptions.IgnoreCase);
                  foreach (System.Diagnostics.Process current in runningProcesses)
                   {
                    // Check for a match.
                     if (processFilter.IsMatch(current.ProcessName))
                       {
                           processRunning = true;
                           break;
                        }
                   }


               return processRunning;
             }


public Boolean KillRunningProcess(String ProcessName)
{
String machine = ".";
Boolean processKilled = false;
// Get the current processes
System.Diagnostics.Process[] runningProcesses = System.Diagnostics.Process.GetProcesses(machine);
// Find those that match the specified regular expression
Regex processFilter = new Regex(ProcessName, RegexOptions.IgnoreCase);

foreach (System.Diagnostics.Process current in runningProcesses)
{
  // Check for a match.
  if (processFilter.IsMatch(current.ProcessName))
  {
   current.Kill();
   processKilled = true;
   break;
  }
}
return processKilled;
}


public bool KillAndStartProcess(String ProcessName)
{
String machine = ".";
Boolean processKilled = false;
// Get the current processes
System.Diagnostics.Process[] runningProcesses = System.Diagnostics.Process.GetProcesses(machine);
// Find those that match the specified regular expression
Regex processFilter = new Regex(ProcessName, RegexOptions.IgnoreCase);
foreach (System.Diagnostics.Process current in runningProcesses)
 {
  // Check for a match.
  if (processFilter.IsMatch(current.ProcessName))
  {
   current.Kill();
   break;
  }
 }
 System.Diagnostics.Process.Start(ProcessName);
 return true;
}}}


Building .NET Library
In order to build the .Net Library code you have just written from the Visual Studio IDE, configure the settings as shown below:


Important: If this setting is not configured, build would generate a DLL but the TLB file generated using regasm on .net command prompt would create .tlb file which would not expose any method in JaWin browser. So this setting is crucial.


Step 2: Creating .tlb file for the .net component

You can create a tlb file for the .net component using Assembly Registration Tool in the Visual Studio command prompt.
Syntax : Regasm /tlb “dll path with dll name”

e.g : regasm /tlb “c:\winprocess.dll” (suppose name of our dll is winprocess.dll and it is available at c:\)

The above command would generate the corresponding .tlb file.


Step 3: How to use JAWIN BROWSER and create JAWIN stub for Java for COM

Download JaWin and extract its files in a directory. Suppose JaWin is available in c:\JaWin folder. Open command prompt and reach the ‘typeBrowser’ folder in Jawin directory.

C:\Jawin\jawin-2.0-alpha1\typebrowser

And then type
java -Xmx256M -jar jawinBrowser.jar

and hit Enter. [Note: Xmx256M in the above command allocates 256 MB RAM to this process]. It would then start the Applet as shown below:


 Go to option ‘Project’ -> ‘New Project’ and type project name and then click on ‘New’ button as shown below:


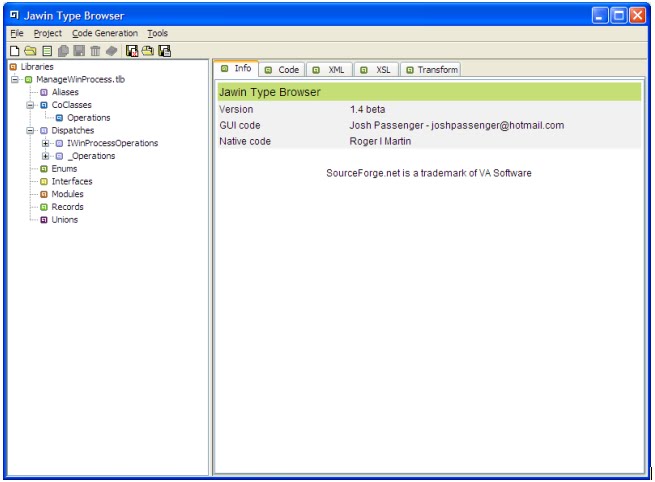
Reach to your TLB file and when you are done, the contents of your tlb would be displayed as shown below:


Expand your interface (IwinProcessOperations in this case) and then select ‘Code Generation’->’Generate Selected Code’ and it would show the corresponding JAVA code under ‘Code’ tab as shown below:


Save this code as a JAVA class. Now you can import this class and use its methods in your code.
Note: Don’t try to modify this class file.


HOW to use JAWIN stub in java application

a). Include jaWin.jar in your build path and

b). Point to the path of jaWin.dll in run configuration by adding the following string under VM arguments(if running the code in eclipse or RAD)
-Djava.library.path="c:\JawinPath"

c). If you have .NET dll, put it in your project folder and register it using regasm command. If you are using pure COM dll then use regsvr32 command to register the COM component.

d). If you are using .net dll which was exposed as a COM then you would need to copy the .net dll in JDK\bin directory otherwise your program would not be able to find the object. This step is nor required if you are using pure COM. For more information visit http://jawinproject.sourceforge.net/jawinarchitecture.html


c). Import/add the Java class (JaWin stub) file created above in your application and then use it. The below snippets shows how to use this stub.


public static void main(String[] args)

{
boolean bResult;
IWinProcessOperations ops=null; //Jawin stub for the COM component
  try
  {
   //I have used Jawin.WinProcessOps because this was mentioned as a Prog id in the //class in .net.
   // You should use the prog id of your COM accordingly.
   ops = new IWinProcessOperations("Jawin.WinProcessOps");
   }


  catch (COMException e1)
   {
    e1.printStackTrace();
    }
  try
  {
   bResult=ops.KillRunningProcess("WINWORD");
  System.out.println("Process is active " + bResult);
  }
  catch (COMException e)
  {
   e.printStackTrace();
  }
}